<?xml version="1.0" encoding="utf-8"?><feed xmlns="http://www.w3.org/2005/Atom" xml:lang="en"><generator uri="https://jekyllrb.com/" version="4.4.1">Jekyll</generator><link href="https://blog.yousefkjm.info/feed.xml" rel="self" type="application/atom+xml" /><link href="https://blog.yousefkjm.info/" rel="alternate" type="text/html" hreflang="en" /><updated>2026-09-25T16:08:19+00:00</updated><id>https://blog.yousefkjm.info/feed.xml</id><title type="html">YMTech</title><subtitle>Yousef Majeed&apos;s personal blog — notes on digital forensics &amp; incident response, SOC operations, cloud engineering, and software development.</subtitle><author><name>Yousef Majeed</name><email>yousefkjm@outlook.com</email></author><entry><title type="html">DFIR Considerations for Docker Containers</title><link href="https://blog.yousefkjm.info/DFIR-Considerations-for-Docker-Containers/" rel="alternate" type="text/html" title="DFIR Considerations for Docker Containers" /><published>2026-09-25T00:00:00+00:00</published><updated>2026-09-25T00:00:00+00:00</updated><id>https://blog.yousefkjm.info/DFIR-Considerations-for-Docker-Containers</id><content type="html" xml:base="https://blog.yousefkjm.info/DFIR-Considerations-for-Docker-Containers/"><![CDATA[<p>Most DFIR training assumes a host that sits still: a disk you can image, a filesystem that isn’t going anywhere, processes that have been running long enough to leave a trail. Containers break most of that. A compromised container can be gone — stopped, removed, rescheduled onto a different node — minutes after the thing that triggered your alert happened. If you don’t know what’s different going in, you’ll lose evidence you didn’t even know was time-limited.</p>

<p>This isn’t a “containers vs VMs” theory post. It’s the practical checklist I actually reach for when a container is in scope.</p>

<h2 id="the-core-problem-ephemeral-by-design">The core problem: ephemeral by design</h2>

<p>Containers are meant to be disposable. That’s the whole point of the model — and it’s exactly what works against you during an investigation:</p>

<ul>
  <li><strong>The writable layer disappears with the container.</strong> Anything the process wrote at runtime lives in a thin, container-specific overlay layer on top of the read-only image. <code class="language-plaintext highlighter-rouge">docker rm</code> (or a scheduler rescheduling the pod) takes that layer with it.</li>
  <li><strong>There’s often no persistent host artifact.</strong> Unlike a compromised VM, there’s frequently nothing left on the node once the container’s gone — no separate disk, no easy “mount the image and look around.”</li>
  <li><strong>Short-lived by default.</strong> Build pipelines, serverless-style workloads, and auto-scaling groups routinely spin containers up and down in minutes. If your detection has any lag at all, the container that triggered it may not exist by the time you respond.</li>
</ul>

<p>The practical upshot: for containers, acquisition speed matters more than it does almost anywhere else in DFIR. Decide your capture plan <em>before</em> you have an incident, not while you’re staring at a container that might vanish in the next scheduler cycle.</p>

<h2 id="live-acquisition-what-to-pull-and-in-what-order">Live acquisition: what to pull, and in what order</h2>

<p>If the container is still running, prioritize the things that die first.</p>

<p><strong>1. Process and network state (most volatile)</strong></p>

<div class="language-bash highlighter-rouge"><div class="highlight"><pre class="highlight"><code>docker top &lt;container_id&gt;
docker <span class="nb">exec</span> &lt;container_id&gt; ps auxf
docker inspect &lt;container_id&gt; <span class="nt">--format</span> <span class="s1">'{{json .State}}'</span>
</code></pre></div></div>

<p><code class="language-plaintext highlighter-rouge">docker inspect</code> also gives you the container’s network namespace, mounted volumes, environment variables, and the exact image digest it was started from — all of which you want in your case notes regardless of what else you collect.</p>

<p><strong>2. The writable layer and filesystem diff</strong></p>

<p><code class="language-plaintext highlighter-rouge">docker diff</code> shows you every file added, changed, or deleted relative to the base image — often the fastest way to spot a dropped webshell or modified binary without diffing the whole filesystem by hand:</p>

<div class="language-bash highlighter-rouge"><div class="highlight"><pre class="highlight"><code>docker diff &lt;container_id&gt;
</code></pre></div></div>

<p>For a full copy of the container’s filesystem as it currently stands:</p>

<div class="language-bash highlighter-rouge"><div class="highlight"><pre class="highlight"><code>docker <span class="nb">export</span> &lt;container_id&gt; <span class="nt">-o</span> container_fs.tar
</code></pre></div></div>

<p>Note that <code class="language-plaintext highlighter-rouge">export</code> flattens the container to a single filesystem snapshot — you lose the layer history in the process. If layer-by-layer provenance matters (e.g., you need to prove <em>which</em> layer introduced a file), work from <code class="language-plaintext highlighter-rouge">docker save</code> on the image instead, or go straight to the host-level storage driver.</p>

<p><strong>3. Logs</strong></p>

<div class="language-bash highlighter-rouge"><div class="highlight"><pre class="highlight"><code>docker logs &lt;container_id&gt; <span class="nt">--timestamps</span> <span class="o">&gt;</span> container_logs.txt
</code></pre></div></div>

<p>Don’t stop at <code class="language-plaintext highlighter-rouge">docker logs</code> — check where the logging driver is actually writing on the host (<code class="language-plaintext highlighter-rouge">json-file</code> under <code class="language-plaintext highlighter-rouge">/var/lib/docker/containers/&lt;id&gt;/</code>, or wherever your driver of choice sends it). If centralized logging (Fluentd, an ELK/EFK stack, CloudWatch) is in place, pull from there too; container-local logs can be truncated, rotated, or lost along with the container itself.</p>

<p><strong>4. Memory</strong></p>

<p>Containers share the host kernel, so there’s no separate “container memory” to acquire the way you’d image a VM’s RAM. What you <em>can</em> do is target the container’s specific process(es) on the host:</p>

<div class="language-bash highlighter-rouge"><div class="highlight"><pre class="highlight"><code><span class="c"># find the host PID for a process inside the container</span>
docker inspect &lt;container_id&gt; <span class="nt">--format</span> <span class="s1">'{{.State.Pid}}'</span>
</code></pre></div></div>

<p>From there, standard Linux memory forensics against that PID (or the whole host, if you have the budget for it) applies.</p>

<h2 id="acquisition-after-the-container-is-already-gone">Acquisition after the container is already gone</h2>

<p>This is the case that actually hurts. A few things still might save the investigation:</p>

<ul>
  <li><strong>The image is not the container.</strong> If the image is still in the local registry or cache, <code class="language-plaintext highlighter-rouge">docker save</code> gets you the base filesystem and layer history — useful for understanding what the container looked like <em>before</em> runtime changes, but it won’t show you anything the attacker did at runtime.</li>
  <li><strong>Volumes often outlive the container.</strong> Any named volume or bind mount the container used typically persists after <code class="language-plaintext highlighter-rouge">docker rm</code>. Check <code class="language-plaintext highlighter-rouge">docker volume ls</code> and don’t assume everything walked out the door with the container.</li>
  <li><strong>The host itself is still an artifact.</strong> Container runtime logs (<code class="language-plaintext highlighter-rouge">dockerd</code>/<code class="language-plaintext highlighter-rouge">containerd</code> logs), the overlay2 storage driver’s on-disk layers under <code class="language-plaintext highlighter-rouge">/var/lib/docker/overlay2/</code>, and host-level EDR/auditd telemetry frequently retain evidence of what happened even after the container object is deleted.</li>
  <li><strong>Orchestrator-level history.</strong> In Kubernetes, check for previous pod events (<code class="language-plaintext highlighter-rouge">kubectl get events</code>), and if a pod was OOMKilled or evicted rather than deliberately removed, <code class="language-plaintext highlighter-rouge">kubectl logs --previous</code> can recover the last container instance’s logs even after a restart.</li>
</ul>

<h2 id="what-to-fix-before-the-next-incident">What to fix before the next incident</h2>

<p>The single highest-leverage change, if you can make it stick: <strong>ship logs and runtime telemetry off-host, continuously, before anything happens.</strong> Everything above is a “try to recover evidence that might already be gone” exercise. A runtime security tool watching syscalls (Falco is the common open-source choice) or simply making sure container logs land somewhere durable turns most of this from forensic recovery into a straightforward log query.</p>

<p>Beyond that: know your acquisition commands cold, and decide in advance whether a suspicious container gets paused (<code class="language-plaintext highlighter-rouge">docker pause</code>, which freezes it without killing it — often the best first move if you’re not sure yet) versus killed. Once it’s gone, you’re working with whatever you had the foresight to ship elsewhere.</p>]]></content><author><name>Yousef Majeed</name><email>yousefkjm@outlook.com</email></author><summary type="html"><![CDATA[Containers break a lot of assumptions incident responders take for granted — persistent disk, long-lived processes, a filesystem that looks the same tomorrow as it did today. Here's what actually changes when the thing you're investigating is a Docker container, and how to acquire evidence before it disappears.]]></summary></entry><entry><title type="html">Containers and Azure Kubernetes Service</title><link href="https://blog.yousefkjm.info/Containers-and-Azure-Kubernetes-Service/" rel="alternate" type="text/html" title="Containers and Azure Kubernetes Service" /><published>2021-01-28T00:00:00+00:00</published><updated>2021-01-28T00:00:00+00:00</updated><id>https://blog.yousefkjm.info/Containers%20and%20Azure%20Kubernetes%20Service</id><content type="html" xml:base="https://blog.yousefkjm.info/Containers-and-Azure-Kubernetes-Service/"><![CDATA[<p align="center">
<img src="/images/posts/article3/aksintro01.png?raw=true" alt="Container and Azure Kubernetes Service" />
</p>

<h3><strong>Short introduction</strong></h3>
<p>Application containerization is not young concept but tools and new capabilities around this topic are still fresh and worth to track. In this article I would like to describe some concepts around containerized ASP .NET Core applications, Docker, Azure Container Registry and Azure Kubernetes Service. I hope that this content will help not only .NET Developers but also everyone who would like to understand the whole concept of containers.</p>

<p><em>To Be Continued…</em></p>]]></content><author><name>Yousef Majeed</name><email>yousefkjm@outlook.com</email></author><summary type="html"><![CDATA[In this article I would like to describe some concepts around containerized ASP .NET Core applications, Docker, Azure Container Registry and Azure Kubernetes Service.]]></summary></entry><entry><title type="html">Azure DevOps with ASP .NET Core Web apps</title><link href="https://blog.yousefkjm.info/Microsoft-Azure-DevOps-for-ASP-.NET-Core-Web-apps/" rel="alternate" type="text/html" title="Azure DevOps with ASP .NET Core Web apps" /><published>2021-01-25T00:00:00+00:00</published><updated>2021-01-25T00:00:00+00:00</updated><id>https://blog.yousefkjm.info/Microsoft%20Azure%20DevOps%20for%20ASP%20.NET%20Core%20Web%20apps</id><content type="html" xml:base="https://blog.yousefkjm.info/Microsoft-Azure-DevOps-for-ASP-.NET-Core-Web-apps/"><![CDATA[<p align="center">
<img src="/images/posts/article2/adevops1.png?raw=true" alt="Microsoft Azure DevOps for ASP .NET Core Web apps" />
</p>

<!-- > **_P.S.:_**  I cleaned up resources, so some likes would not . -->

<h3><strong>Short introduction</strong></h3>
<p>Before we start with Microsoft Azure DevOps service lets explain what DevOps is. “DevOps is the union of people, process, and products to enable continuous delivery of value to your end users.” As you can see this is not one specific thing. Azure DevOps is a solution created to support this “union”. It provides tools to manage team work collected in the backlog, it provides GIT repositories to store the code, it provides automatic builds and releases once there is new feature commited. In this article I would like to present how to use Azure DevOps to provide continuous integration and delivery for ASP .NET Core Web Apps. If you want to read more about Azure DevOps visit <a href="https://azure.com/devops" target="_blank" rel="noopener">official website</a>.</p>

<p> </p>
<h3><strong>Project structure and setup</strong></h3>
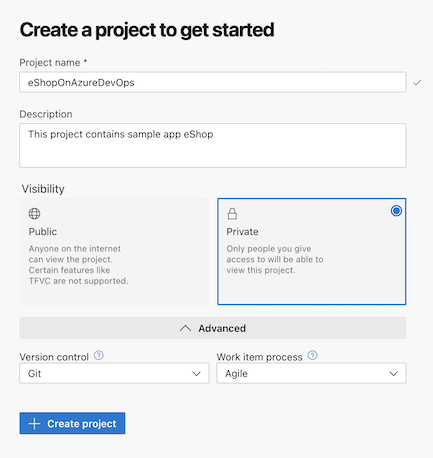
<p>Creating account in the Azure DevOps is free. You can create one using <a href="https://azure.microsoft.com/en-us/services/devops/?nav=min" target="_blank" rel="noopener">this</a> link. Once you sign in you should see main panel where you can manage your organization settings and projects. Lets start from creating new project. Click “Create project” button. Provide the name for the project and short description. Below select GIT version control and Agile work items process. Click “Create project” button:</p>

<p><img class=" wp-image-1581 aligncenter" src="/images/posts/article2/adevops2.png?w=238" width="433" alt="" /></p>

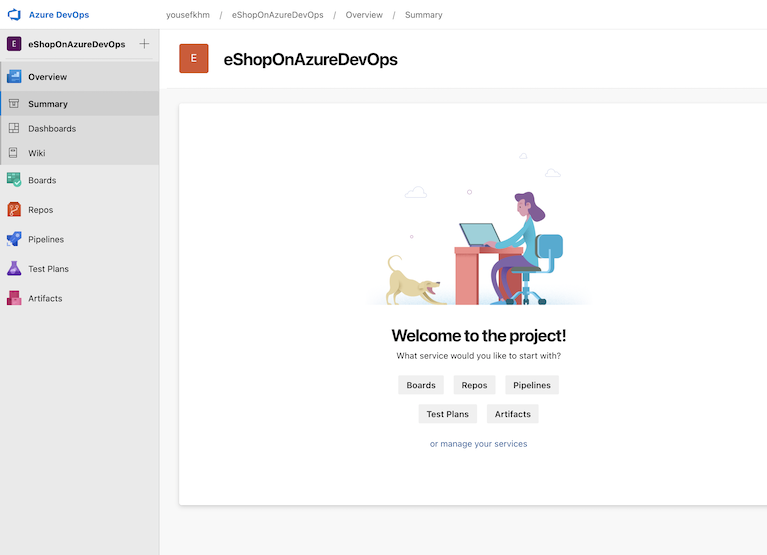
<p>Once project is created you should see navigation panel:</p>

<p><img class=" wp-image-1583 aligncenter" src="/images/posts/article2/adevops3.png?w=300" alt="" width="767" /></p>

<p> </p>
<h3><strong>Repository setup</strong></h3>
<h3><img class="alignnone wp-image-1601" src="/images/posts/article2/adevops4.png?w=300" alt="" width="156" height="124" /></h3>
<p>In this section we will commit project’s code to the GIT repository in the Azure DevOps. For this article I used already created, open source project called “eShopOnWeb”. Download its code from <a href="https://github.com/dotnet-architecture/eShopOnWeb" target="_blank" rel="noopener">GitHub here</a>.</p>

<p><img class=" wp-image-1586 aligncenter" src="/images/posts/article2/adevops5.png?w=234" alt="" width="285" height="364" /></p>

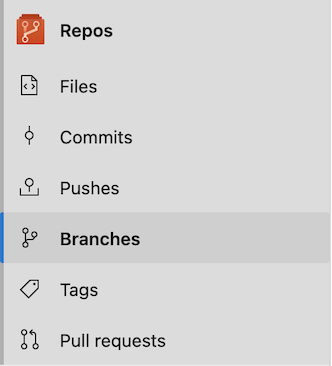
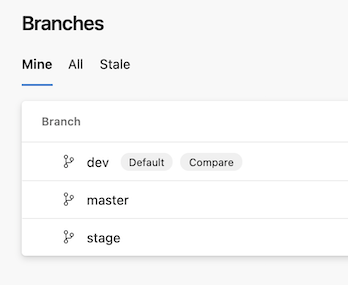
<p>Open “Repos” tab and select “Branches”. In the right top corner click “New branch” button. Create two more branches so in total there will be three of them: master, stage and dev:</p>

<p><img class=" wp-image-1588 aligncenter" src="/images/posts/article2/adevops6.png?w=270" alt="" width="331" /></p>

<p><img class=" wp-image-1589 aligncenter" src="/images/posts/article2/adevops7.png?w=300" alt="" width="348" /></p>

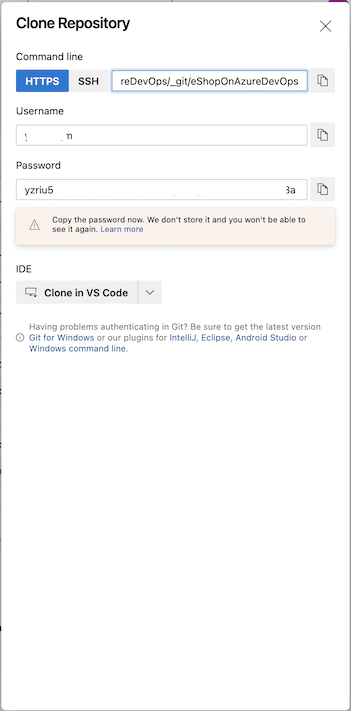
<p>Once you have branches ready there is one more thing to do - set “dev” branch as default one. Click “Project setting” on the bottom and go to the “Repositories” tab. Click on the “dev” branch and select three dots on the right - select “Set as default branch”. Once we have branches ready it is time to commit the code to the “dev” branch. Download code from GitHub first. Then it is time to map our GIT repository. Open “Repos” tab and click “Clone” button. Generate GIT credentials here. I am not sue which tool you prefer to use so lets omit the part with commits, and for me I prefer dealing with git command line since it’s a way faster than the other method - the only thing here is that source code from GitHub should be committed to the Azure DevOps GIT repository.</p>

<p><img class=" wp-image-1595 aligncenter" src="/images/posts/article2/adevops8.png?w=300" alt="" width="351" /></p>

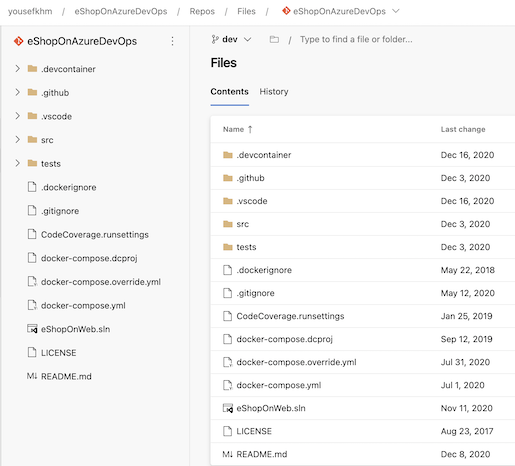
<p>Once you commit the code it should appear in the AzureDevOps portal:</p>

<p><img class=" wp-image-1614 aligncenter" src="/images/posts/article2/adevops9.png?w=300" alt="" width="515" /></p>

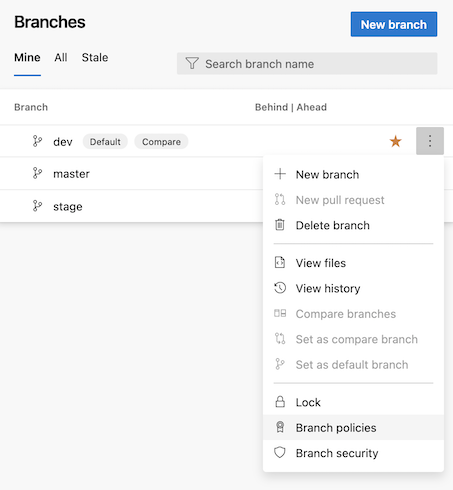
<p>There is great feature for branches called “Branch policy”. We can set few different policies for the branch - for instance you cannot complete pull request if you did not set tasks related with it or you cannot complete pull request if the code from your branch cannot be built. Below I presented how to setup policy for “dev” branch. In the “Branches” section click three dots next to “dev” branch and select “Branch policies”:</p>

<p><img class=" wp-image-1723 aligncenter" src="/images/posts/article2/adevops10.png?w=300" alt="" width="453" /></p>

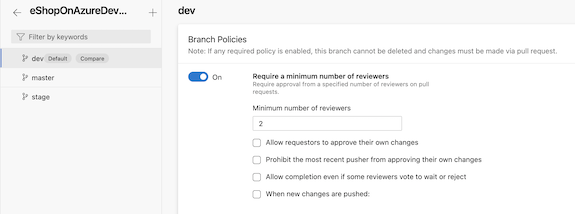
<p>Select “Require a minimum number of reviewers”. If you enable this policy you will not be able to merge changes before two specified reviewers will do the code review of your proposed changes:</p>

<p><img class=" wp-image-1724 aligncenter" src="/images/posts/article2/adevops11.png?w=300" alt="" width="575" /></p>

<p>This will also enforce the use of pull requests when updating the branch.</p>

<p> </p>
<h3><strong>Board setup</strong></h3>
<h3><img class="alignnone wp-image-1603" src="/images/posts/article2/adevops12.png?w=300" alt="" width="168" height="121" /></h3>
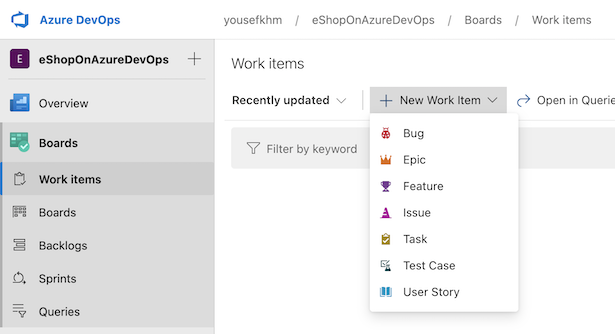
<p>With Azure DevOps boards you can plan the team work and create backlog for your product. You can create tasks, issues, bugs, user stories and features:</p>

<p><img class=" wp-image-1607 aligncenter" src="/images/posts/article2/adevops13.png?w=300" alt="" width="615" /></p>

<p>If you want to read more about backlog configuration with Azure DevOps please refer to <a href="https://docs.microsoft.com/en-us/azure/devops/boards/backlogs/backlogs-overview?view=vsts&amp;tabs=new-nav" target="_blank" rel="noopener">this</a> documentation.</p>

<p>For now we will create one user story and one task inside it. User story and task will be related with updating ReadMe file:</p>

<p><img class=" wp-image-1609 aligncenter" src="/images/posts/article2/adevops14.png?w=300" alt="" width="745" /></p>

<p>Of course you can add as many stories as you need for the project.</p>

<p> </p>
<h3><strong>Build pipeline setup</strong></h3>
<h3><img class="alignnone wp-image-1604" src="/images/posts/article2/adevops15.png?w=300" alt="" width="175" height="122" /></h3>
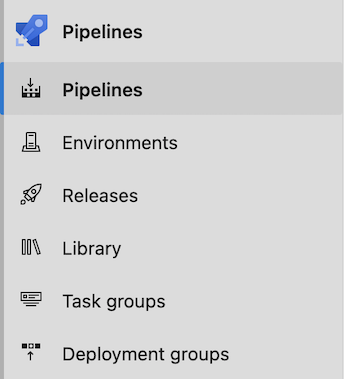
<p>In this section we will setup build pipeline for our web app project. We want to build the code each time when there is an update on the source code from “dev” branch. To configure automatic build open “Pipelines” tab and open “Pipelines” section:</p>

<p><img class=" wp-image-1618 aligncenter" src="/images/posts/article2/adevops16.png?w=300" alt="" width="345" /></p>

<p>Click “Create pipeline” button and then select “Use the classic editor to create a pipeline without YAML.”</p>

<p>There are few steps:</p>

<ol>
  <li>
    <p>Location-we have to indicate where the code is located - in our case this will be “Azure Repos GIT”: <br /> 
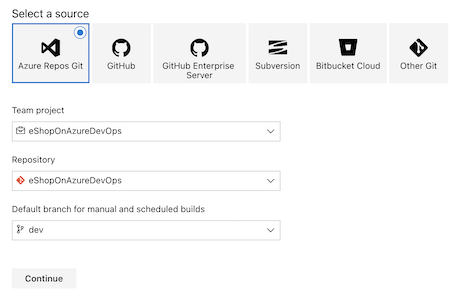
  <img class=" wp-image-1630 aligncenter" src="/images/posts/article2/adevops17.png?w=300" alt="" width="457" /></p>
  </li>
  <li>
    <p>In this step we can select template for our build - this is very convenient because we do not have to define everything from scratch. Select “ASP .NET Core” template: <br /> 
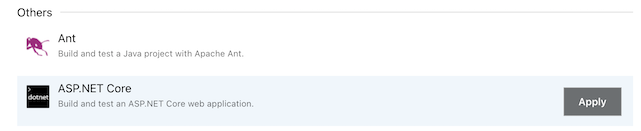
  <img class=" wp-image-1631 aligncenter" src="/images/posts/article2/adevops18.png?w=300" alt="" width="641" /></p>
  </li>
  <li>
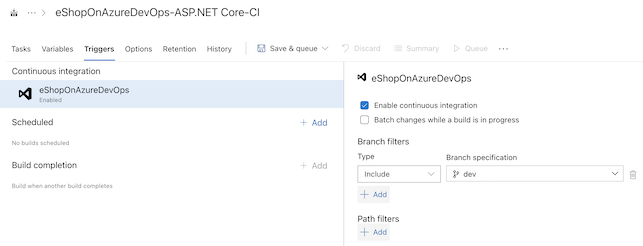
    <p>There will be pre-configured steps displayed. We want to build our code each time new merge is done. To do this select “Enable continuous integration” in the “Triggers” section: <br />
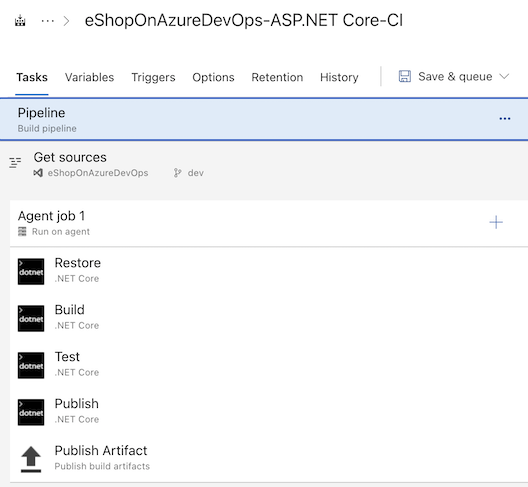
  <img class=" wp-image-1633 aligncenter" src="/images/posts/article2/adevops19.png?w=300" alt="" width="528" />
  <img class=" wp-image-1634 aligncenter" src="/images/posts/article2/adevops20.png?w=300" alt="" width="643" /></p>
  </li>
  <li>
    <p>Lets change build definition name to “eShopOnAzureDevOps-ASP.NET Core-CI-DEV”-just click on the text on top.</p>
  </li>
  <li>
    <p>Click “Save &amp; queue” button. Select “Azure Pipelines” as build agent. New build should be scheduled: <br />
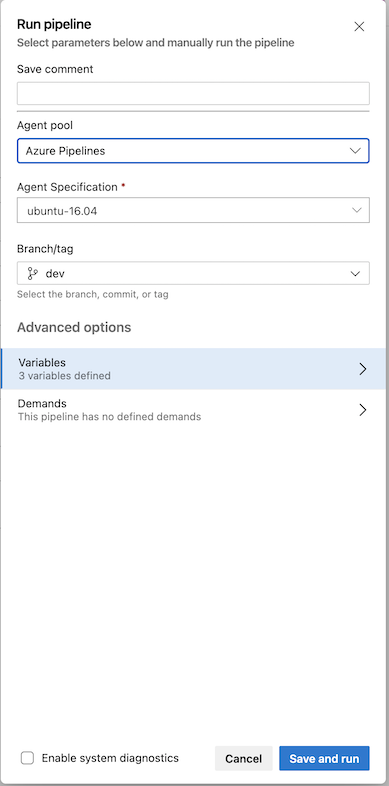
  <img class=" wp-image-1638 aligncenter" src="/images/posts/article2/adevops21.png?w=300" alt="" width="389" />
  <img class=" wp-image-1637 aligncenter" src="/images/posts/article2/adevops22.png?w=300" alt="" width="643" /></p>
  </li>
  <li>
    <p>Once build if finished we can check the result: <br />
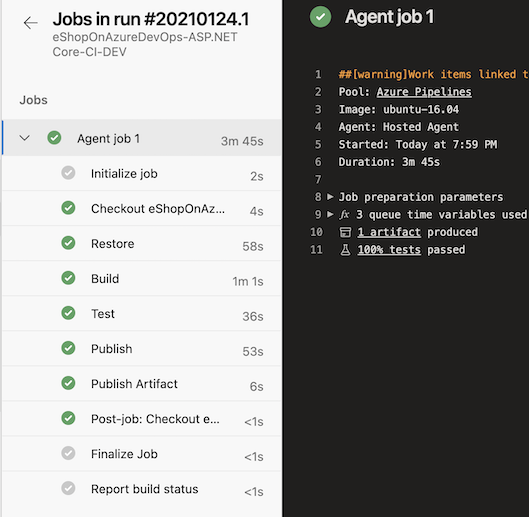
  <img class=" wp-image-1641 aligncenter" src="/images/posts/article2/adevops23.png?w=300" alt="" width="529" /></p>
  </li>
</ol>

<p>We can move forward to the next section.</p>

<p> </p>
<h3><strong>Release pipeline setup</strong></h3>
<p><img class="alignnone wp-image-1604" src="/images/posts/article2/adevops24.png?w=300" alt="" width="171" height="119" /></p>

<blockquote>
  <p><strong><em>NOTE:</em></strong>  <span style="color:red"> I scaled down Azure service plan to the free tier to stop billing so all deployment slots has been removed and I may do clean up all resources after a while so some links below will not work properly.</span></p>
</blockquote>

<p>We will host our application using Microsoft Azure Web App service. In this section I would like to present how to use Azure Web App deployment slots so you can deploy two (or more) versions of the application so its available under different URL addresses. You can read more about deployment slots <a href="https://docs.microsoft.com/en-us/azure/app-service/web-sites-staged-publishing" target="_blank" rel="noopener">here</a>. As a result of below setup we will configure two different release pipelines: one for demo and one for production.</p>

<p><strong>Create web application in Azure portal</strong></p>

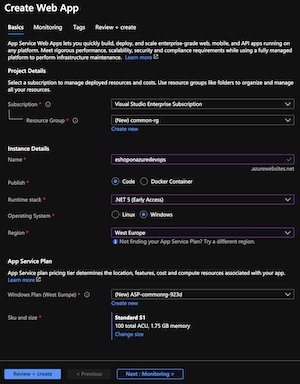
<p>Login to the Azure portal and create new Web App service inside new resource group:</p>

<p><img class=" wp-image-1647 aligncenter" src="/images/posts/article2/adevops25.png?w=145" alt="" width="300" /></p>

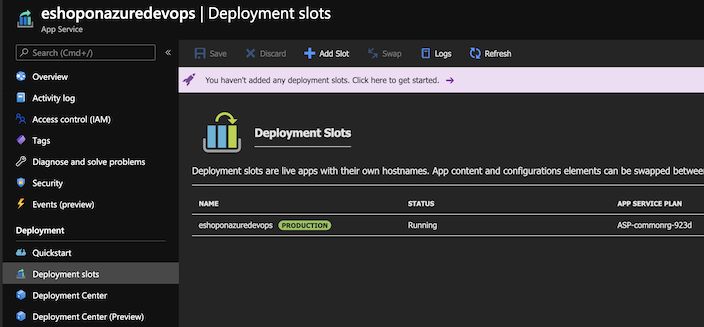
<p>Please remember to select S1 App Service Plan because it provides deployment slots feature. Once Web App is created open it and go to the “Deployment slots” tab:</p>

<p><img class=" wp-image-1649 aligncenter" src="/images/posts/article2/adevops26.png?w=300" alt="" width="704" /></p>

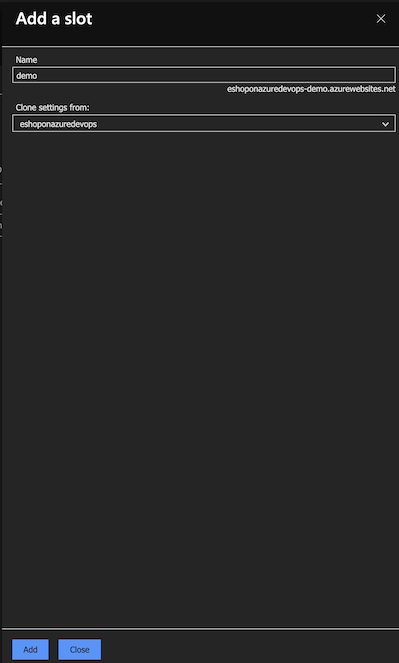
<p>Click “Add Slot” button and add new slot called “demo”. Copy configuration from production slot:</p>

<p><img class=" wp-image-1651 aligncenter" src="/images/posts/article2/adevops27.png?w=210" alt="" width="399" /></p>

<p>Once deployment slot is created click it. Note that there is new URL created:</p>

<p>https://eshoponazuredevops-<strong>demo</strong>.azurewebsites.net</p>

<p>Production app URL looks like below:</p>

<p>https://eshoponazuredevops.azurewebsites.net</p>

<p>Now we can connect Azure DevOps with Azure subscription to configure release pipeline.</p>

<p> </p>

<p><strong>Setup connection between Azure and Azure DevOps</strong></p>

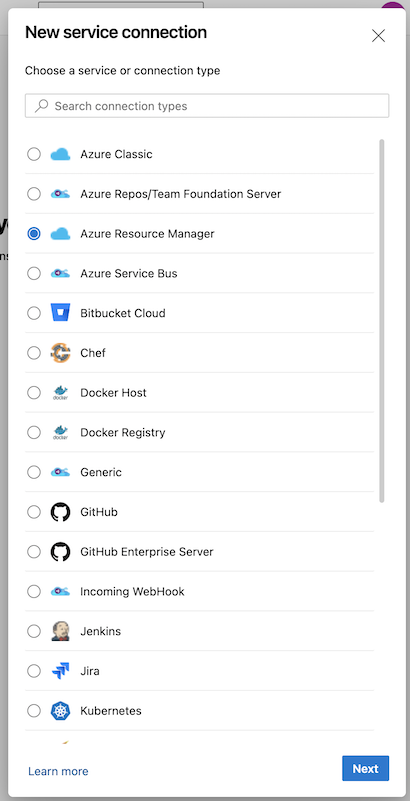
<p>Click “Project settings” on the bottom of AzureDevOps page. Go to “Service connections” under “Pipeline” section. Click “Create service connection” and select “Azure Resource Manager” and then select “Service principal (automatic)”:</p>

<p><img class=" wp-image-1655 aligncenter" src="/images/posts/article2/adevops28.png?w=262" alt="" width="410" /></p>

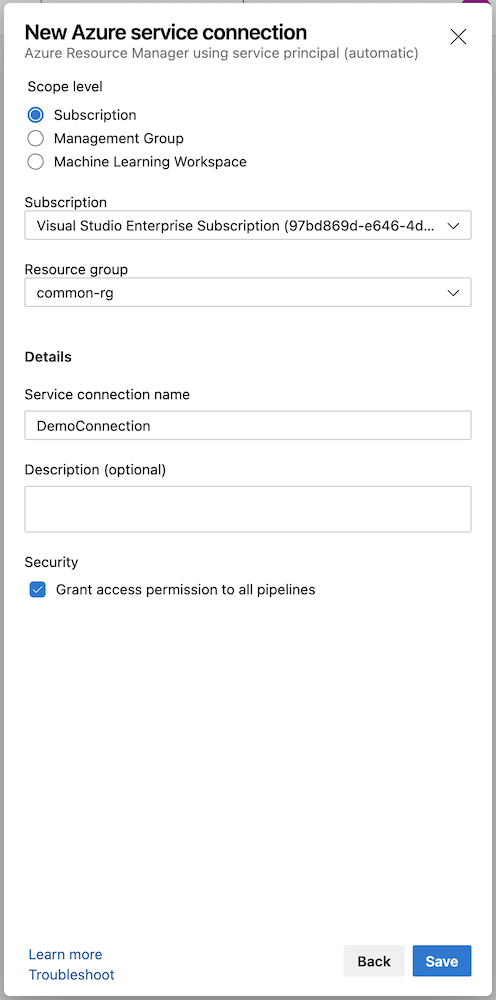
<p>Select Azure subscription, resource group and type connection name. Then click “Save”:</p>

<p><img class=" wp-image-1658 aligncenter" src="/images/posts/article2/adevops29.png?w=300" alt="" width="496" /></p>

<p>Connection should be visible on the list. Now we can configure release pipeline.</p>

<p> </p>

<p><strong>Configure release pipeline</strong></p>

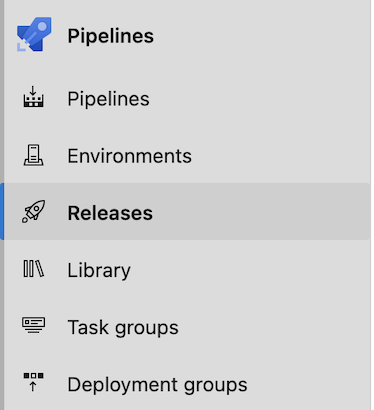
<p>Open “Releases” tab in the “Pipelines” section:</p>

<p><img class=" wp-image-1661 aligncenter" src="/images/posts/article2/adevops30.png?w=300" alt="" width="374" /></p>

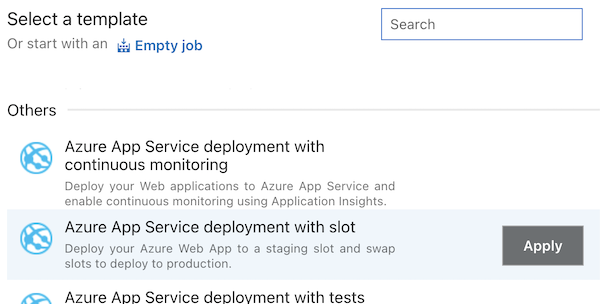
<p>Click “New pipeline” button. On the right side please find and select “Azure App Service deployment with slot”:</p>

<p><img class=" wp-image-1664 aligncenter" src="/images/posts/article2/adevops31.png?w=300" alt="" width="612" /></p>

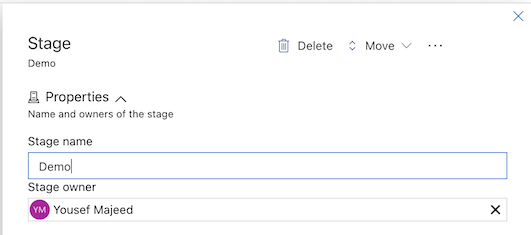
<p>Type “Demo” in the “stage name” field and click “X” icon to close the tab:</p>

<p><img class=" wp-image-1667 aligncenter" src="/images/posts/article2/adevops32.png?w=300" alt="" width="531" /></p>

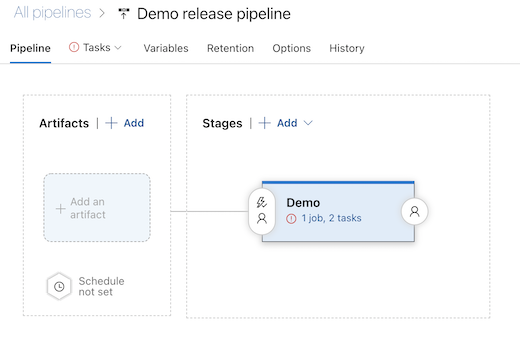
<p>Now change the name of the release to: “Demo release pipeline” and after that click “Add an artifact”:</p>

<p><img class=" wp-image-1671 aligncenter" src="/images/posts/article2/adevops33.png?w=300" alt="" width="520" /></p>

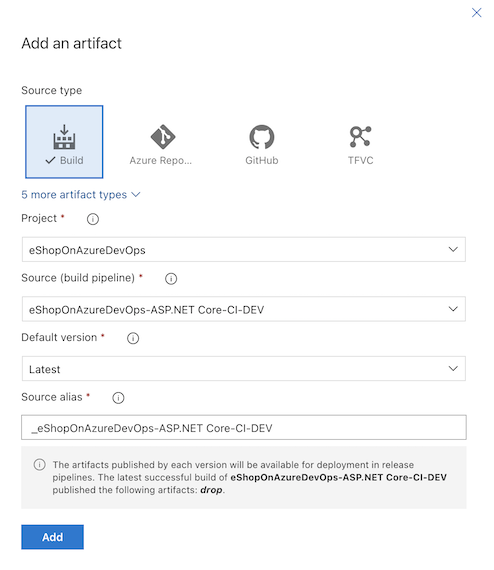
<p>Select project and then set “default version” to “latest”. “Source alias” should be set to “_eShopOnAzureDevOps-ASP.NET Core-CI-DEV” - our build definition we created earlier in the article:</p>

<p><img class=" wp-image-1673 aligncenter" src="/images/posts/article2/adevops34.png?w=285" alt="" width="494" /></p>

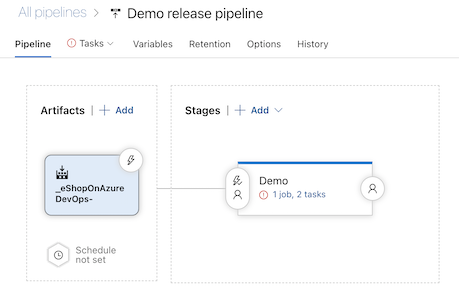
<p>Once you click “Add” button you should see configured artifact for our release pipeline definition:</p>

<p><img class=" wp-image-1677 aligncenter" src="/images/posts/article2/adevops35.png?w=300" alt="" width="459" /></p>

<p> </p>

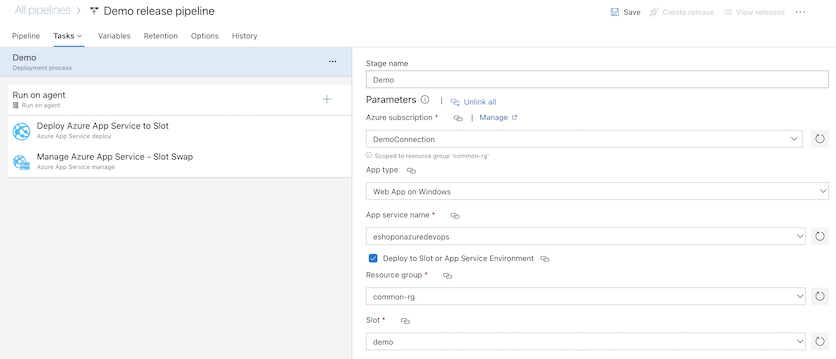
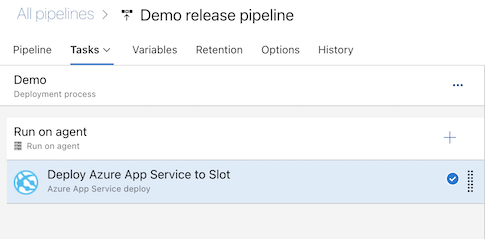
<p>Now we have to integrate our release pipeline with the Azure Web App created earlier in the article. Click “1 job, 2 tasks” under “Demo”stage. In this step you have to provide name of the Azure subscription, App type, Azure service name, Resource group and Slot (in this case “demo”):</p>

<p><img class=" wp-image-1679 aligncenter" src="/images/posts/article2/adevops36.png?w=300" alt="" width="836" /></p>

<p>For now we can remove next step called “Slot swap”. Click remove in the right top corner to remove this step from the release pipeline. Only deploy to slot should remain:</p>

<p><img class=" wp-image-1683 aligncenter" src="/images/posts/article2/adevops37.png?w=300" alt="" width="485" /></p>

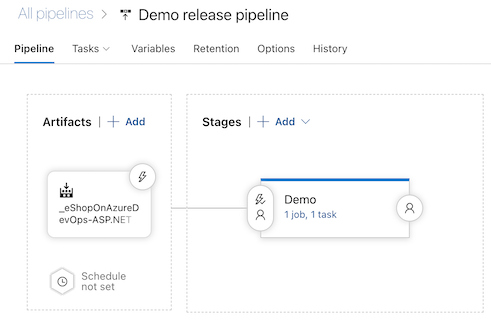
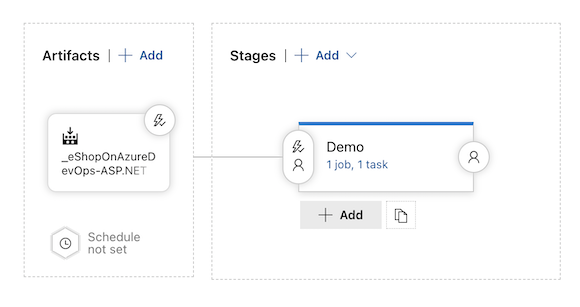
<p>Click “Save” and then “OK” buttons. Our final pipeline looks like presented below:</p>

<p><img class=" wp-image-1687 aligncenter" src="/images/posts/article2/adevops38.png?w=300" alt="" width="491" /></p>

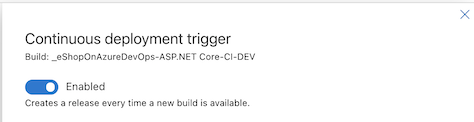
<p>One more thing - we need to enable trigger for this release pipeline each time there is new build. Click lightning icon in the “Artifacts” and enable below trigger. Then click “Save” and “OK” buttons:</p>

<p><img class="alignnone wp-image-1691 aligncenter" src="/images/posts/article2/adevops39.png?w=300" alt="" width="474" /></p>

<p> </p>

<p> </p>

<p><strong>Test release pipeline for demo slot</strong></p>

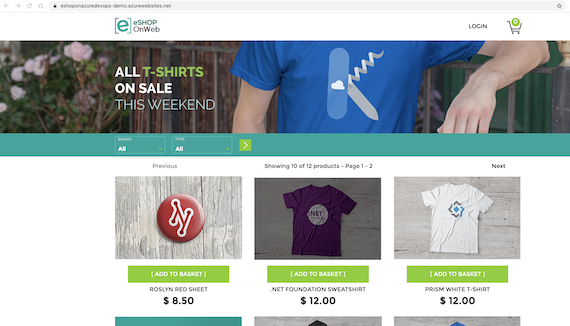
<p>Now we can try to test whether we configure everything properly. Try to commit some changes to the dev branch and see if build was scheduled and if release was completed successfully. If everything went ok you should access web app under demo URL address:</p>

<p><a href="https://eshoponazuredevops-demo.azurewebsites.net" target="_blank">https://eshoponazuredevops-demo.azurewebsites.net</a></p>

<p><img class=" wp-image-1693 aligncenter" src="/images/posts/article2/adevops40.png?w=300" alt="" width="570" /></p>

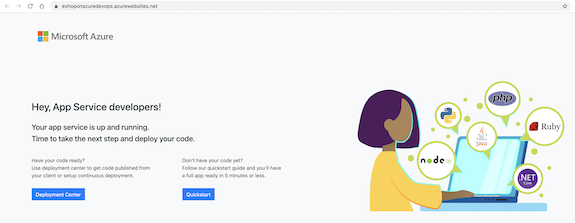
<p>Please note that under production URL https://eshoponazuredevops.azurewebsites.net there is no app available:</p>
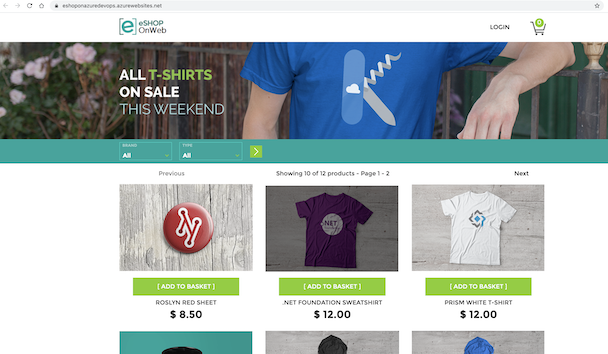
<p><img class=" wp-image-1696 aligncenter" src="/images/posts/article2/adevops41.png?w=300" alt="" width="575" /></p>

<p> </p>

<p><strong>Configure slot swap in the release definition</strong></p>

<p>Once demo environment is ready we can use “slot swap”. This step in release pipeline enables moving application from the “demo” slot to the production slot.</p>

<p>Click “Add” button under “Demo” stage:</p>

<p><img class=" wp-image-1700 aligncenter" src="/images/posts/article2/adevops42.png?w=300" alt="" width="580" /></p>

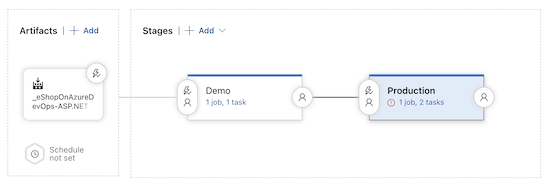
<p>Again search for “Azure App Service deployment with slot” template and type “Production” as stage name. Click “X” button in the right corner. Now our pipeline look like below:</p>

<p><img class=" wp-image-1703 aligncenter" src="/images/posts/article2/adevops43.png?w=300" alt="" width="553" /></p>

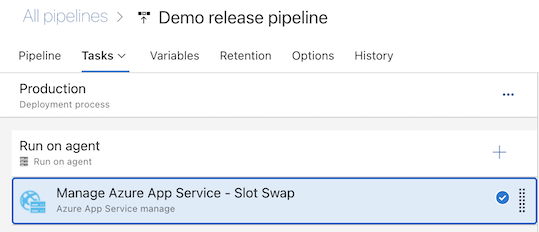
<p>Now click “1 job, 2 tasks” on the Production stage. This time remove “Deploy Azure App Service to Slot” and in the “Manage Azure App Service - Slot Swap”. Again select Azure subscription, app service name, resource group and slot:</p>

<p><img class=" wp-image-1706 aligncenter" src="/images/posts/article2/adevops44.png?w=300" alt="" width="539" /></p>

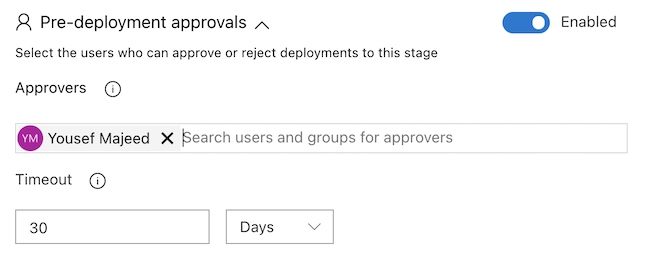
<p>Click “Save” and then “OK” button. Now we want to have approval before demo app is moved to production. It means that someone has to confirm this slot swap. We have to set pre-deployment conditions. Click lightning icon on the Production stage and then set “Pre-deployment approvals” to enabled:</p>

<p><img class=" wp-image-1709 aligncenter" src="/images/posts/article2/adevops45.png?w=300" alt="" width="645" /></p>

<p>Then set one of the approvers - person (or people) who will accept deployment to Production stage:</p>

<p><img class=" wp-image-1711 aligncenter" src="/images/posts/article2/adevops46.png?w=300" alt="" width="618" /></p>

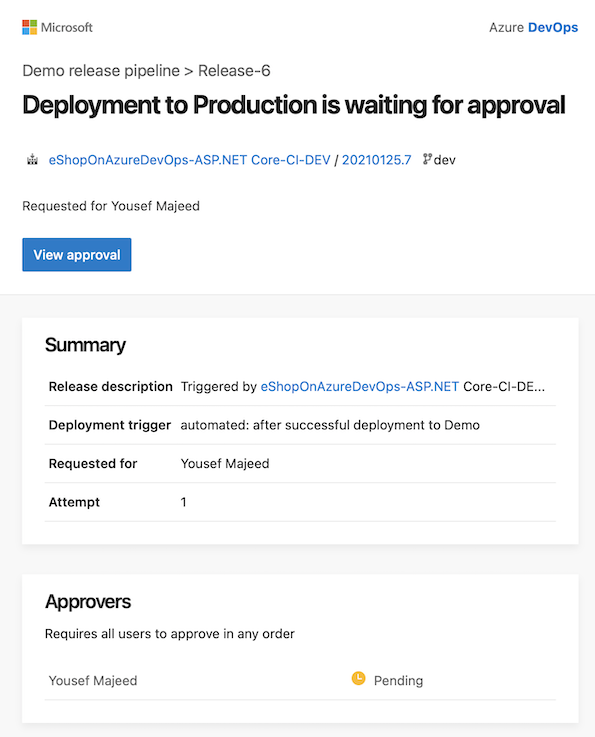
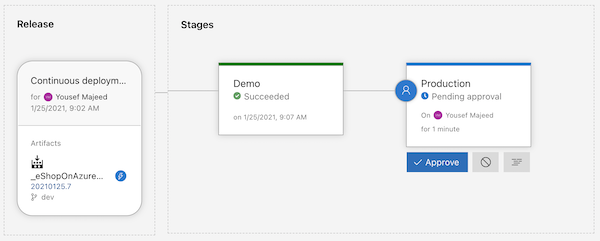
<p>Click “Save” and then “OK” button. Now try to commit some changes to the source code of the web app. Before there is slot swap to Production you will have to wait for approval. Approves should receive e-mails with the information that new build is ready and swap to Production can be proceeded:</p>

<p><img class=" wp-image-1717 aligncenter" src="/images/posts/article2/adevops47.png?w=300" alt="" width="595" />
<img class=" wp-image-1718 aligncenter" src="/images/posts/article2/adevops48.png?w=300" alt="" width="600" /></p>

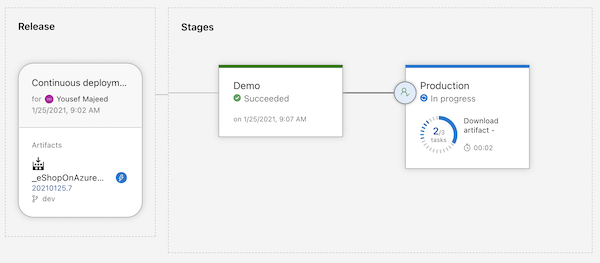
<p>Once swap is approved in the portal information about deployment is displayed:</p>

<p><img class=" wp-image-1718 aligncenter" src="/images/posts/article2/adevops49.png?w=300" alt="" width="600" /></p>

<p>Now lets try to open production URL: <a href="https://eshoponazuredevops.azurewebsites.net" target="_blank">https://eshoponazuredevops.azurewebsites.net</a></p>

<p><img class=" wp-image-1720 aligncenter" src="/images/posts/article2/adevops50.png?w=300" alt="" width="608" /></p>

<p> </p>
<h3><strong>Summary</strong></h3>
<p>Microsoft Azure DevOps provides tools to manage team work collected in the backlog, it provides GIT repositories to store the code, it provides automatic builds and releases. It help developers and DevOps engineers with setting up the whole Development and Operations related stuff. It is available for free and its worth to mention that it supports not only Microsoft technologies (like ASP .NET Core web applications mentioned in this article). You can read more about Azure DevOps on the official <a href="https://azure.microsoft.com/en-us/services/devops/" target="_blank" rel="noopener">website</a>.</p>]]></content><author><name>Yousef Majeed</name><email>yousefkjm@outlook.com</email></author><summary type="html"><![CDATA[In this article I would like to present how to use Azure DevOps to provide continuous integration and delivery for ASP .NET Core Web Apps.]]></summary></entry><entry><title type="html">Hello World!</title><link href="https://blog.yousefkjm.info/Hello-World/" rel="alternate" type="text/html" title="Hello World!" /><published>2021-01-22T00:00:00+00:00</published><updated>2021-01-22T00:00:00+00:00</updated><id>https://blog.yousefkjm.info/Hello-World</id><content type="html" xml:base="https://blog.yousefkjm.info/Hello-World/"><![CDATA[<p><img src="/images/posts/article1/initial.png" alt="My first article" /></p>

<p>Welcome to the launch of the new YMTech blog website and my first blog post! My name is Yousef Majeed and this is my personal blog or better my personal knowledge base where I am writing down my thoughts all around technology.</p>

<p>Although the main part of this blog activities was to share knowledge and passion about Microsoft Azure, DevOps and ASP.NET but now I think it may extend to anything related to technology as well.</p>

<p>If you like any of my posts, please share them with others. Also, let me know if there are any topics you’d like me to write about. I’ll try to incorporate a few of your suggestions into future posts.</p>

<p>Thanks for stopping by.</p>]]></content><author><name>Yousef Majeed</name><email>yousefkjm@outlook.com</email></author><summary type="html"><![CDATA[HELLO & WELCOME TO MY FIRST BLOG POST]]></summary></entry></feed>